About 67% of indoor plant owners kill their plants within the first year. Root damage during repotting is one of the leading causes. This statistic shows how common repotting mistakes really are.
Repotting is one of the most important maintenance tasks for healthy houseplants. Your plants depend on proper root care to survive and grow strong. Many beginners worry about hurting their beloved green friends during this process.
The good news is simple: repotting without damaging roots is completely achievable. You just need the right knowledge, the correct tools, and a clear approach.
This guide will teach you everything you need to know. You will learn when your plant needs repotting and why timing matters. You will discover which containers work best and how to pick the right size.
Most importantly, you will master the exact steps for repotting without damaging roots. Your plant’s root system is its lifeline. Roots pull water and nutrients from the soil while anchoring the plant in place.
By protecting your roots during repotting, you protect your plant’s future. You will feel confident about this essential plant care task soon. Let’s get started on becoming a better plant parent.
Why Repotting is Necessary for Indoor Plants
Indoor plants gradually outgrow their containers as they grow. Without proper attention, this situation leads to serious health problems. Understanding the right timing keeps your plants thriving and prevents permanent damage.
Repotting is not just about giving plants more space. It’s about maintaining their overall health and vitality.
Signs Your Plant Needs Repotting
Your plant sends clear signals when it’s ready for a new home. Learning to recognize these indicators helps you act at the right time. Here are the main signs that tell you it’s time to repot:
- Roots growing through drainage holes at the bottom of the pot
- Roots circling around the soil surface in visible patterns
- Water running straight through the pot without being absorbed
- Stunted growth despite proper care and lighting
- Soil drying out much faster than it did before
- Plant becoming top-heavy and tipping over frequently
Repotting root bound plants is especially important because densely packed roots prevent proper nutrient absorption. Roots circle tightly and can’t expand when they become root bound. This restricts water movement and prevents the plant from getting needed nutrients.
Benefits of Repotting
Repotting your indoor plants at the right time brings many advantages. Fresh soil provides nutrients that become depleted over time. New potting mix also improves drainage and aeration around the roots.
| Repotting Benefit | What It Does for Your Plant |
|---|---|
| Refreshed Nutrient-Rich Soil | Restores essential nutrients plants use up over months |
| Improved Drainage | Prevents water from sitting around roots too long |
| Better Aeration | Allows oxygen to reach roots for healthy growth |
| Renewed Growth and Vigor | Plants develop stronger stems and fuller foliage |
| Prevention of Root Rot | Stops disease and decay that kill indoor plants |
| Root Health Inspection | Lets you spot problems early and take action |
Repotting gives your plants the physical space they need for healthy root systems. Stronger roots mean better nutrient uptake, which creates more robust foliage. Understanding proper timing prevents both premature repotting and delayed repotting that causes lasting damage.
Choosing the Right Pot for Your Indoor Plants
Selecting the right container is crucial for your plant’s success. Your choice affects drainage, air circulation, and water retention. The pot you pick impacts how well your plant grows and stays healthy.
Choosing larger pots for indoor plants requires careful thought about material and size. Each option offers unique benefits for different plant types.
Materials to Consider
Different pot materials work better for different plants. Understanding each option helps you make the best choice.
- Terracotta and Clay Pots: These are porous, which means air and moisture pass through the walls. They work great for plants that like drier soil. The downside is they dry out quickly and can break easily.
- Plastic Pots: Lightweight and affordable, plastic pots keep moisture in longer. They’re perfect for plants that enjoy staying moist. Plastic is durable and easy to clean.
- Ceramic and Glazed Pots: These look beautiful and come in many colors. The glaze seals the surface, so moisture doesn’t escape as fast. Make sure your ceramic pot has drainage holes.
- Fabric Pots: These breathable containers provide excellent air circulation around roots. They prevent root rot and are ideal for plants that need good drainage.
Drainage holes are essential regardless of material. Without them, water pools at the bottom and roots rot. Always check that your chosen pot has proper drainage openings.
Pot Size: What You Need to Know
Choosing larger pots for indoor plants requires understanding proper sizing. The general rule is selecting a pot 1 to 2 inches larger in diameter. This gives roots room to grow without creating excess soil.
Many people make the mistake of overpotting by picking a container that’s too large. A pot that’s too big holds too much soil and water around the roots. This leads to waterlogged conditions and root rot.
A pot that’s too small defeats the purpose of repotting. Your plant needs space to expand and develop new roots. Different plants have different preferences for root space.
| Plant Type | Ideal Pot Size Increase | Reason |
|---|---|---|
| Succulents | 1 inch larger | Prefer drier conditions and smaller spaces |
| Tropical Plants | 2 inches larger | Need more room for root expansion |
| Orchids | 1 inch larger | Like tight spaces with excellent drainage |
| Ferns | 2 inches larger | Require moisture and ample growing space |
Depth is just as important as width for healthy root growth. Your plant’s roots need vertical space to grow downward. Measure your current pot’s diameter and depth before shopping for new containers.
“The right pot size is like finding the perfect shoe—too tight and it’s uncomfortable, too loose and you’ll trip.”
Take time to assess your plant’s root system and growth habits. This helps you avoid common mistakes and supports healthy growth.
Tools Required for Repotting Indoor Plants
Getting ready to repot your indoor plants means gathering the right equipment beforehand. Having everything prepared makes the process faster and less stressful for your plant. Organizing your tools reduces the time your plant’s roots sit exposed to air.
Essential Gardening Tools
You will need certain tools to complete the repotting job safely and effectively. These items protect both your plant and your hands during the process.
- Gardening gloves – Protect your hands from soil, sharp roots, and any plant irritants
- Trowel or small shovel – Helps you scoop and move fresh potting soil into your new pot
- Pruning shears or scissors – Trim damaged, dead, or overgrown roots with clean cuts
- Fresh potting soil – Choose soil that matches your specific plant’s needs
- New pot with drainage holes – Prevents water from sitting and rotting the roots
- Watering can – Used after repotting to settle the soil and hydrate your plant
Optional Tools That Might Help
Beyond the basics, several tools can make your experience smoother and easier. These items are nice to have but not absolutely required for success.
- Root hook or chopstick – Gently loosens packed soil around the roots
- Soil scoop – Transfers soil without mess or spillage
- Moisture meter – Checks soil wetness before and after repotting
- Newspaper or drop cloth – Protects your work surface from dirt and moisture
- Spray bottle – Mists roots during handling to keep them from drying out
- Plant caddy or turntable – Allows you to reach all sides of your plant easily
| Tool Type | Purpose | Essential or Optional |
|---|---|---|
| Gardening Gloves | Hand protection from soil and plant irritants | Essential |
| Trowel or Small Shovel | Scooping and moving potting soil | Essential |
| Pruning Shears | Trimming damaged or overgrown roots | Essential |
| Fresh Potting Soil | Growing medium for root health | Essential |
| New Pot with Drainage | Container for your repotted plant | Essential |
| Watering Can | Hydrating plant after repotting | Essential |
| Root Hook or Chopstick | Loosening compacted soil gently | Optional |
| Soil Scoop | Mess-free soil transfer | Optional |
| Moisture Meter | Testing soil moisture levels | Optional |
| Newspaper or Drop Cloth | Protecting work surface | Optional |
| Spray Bottle | Misting roots during the process | Optional |
| Plant Caddy or Turntable | Easy access to all plant sides | Optional |
Being organized makes your experience much smoother. Quick work means less shock to your plant. This leads to better outcomes for root health and growth.
Preparing Your Plant for Repotting
Getting your plant ready before you begin is crucial for successful repotting. Taking time to prepare prevents root damage and reveals your plant’s health status. This preparation includes watering at the right time and checking roots carefully.
Watering Before You Begin
Timing your watering schedule matters greatly before repotting indoor plants. Water your plant thoroughly one to two days before you start. This timing gives you the perfect moisture balance—moist soil without waterlogging.
Moist soil sticks together and slides out easily from the pot. Dry soil crumbles and breaks apart, damaging delicate root structures. Soil that is too wet creates messy conditions and obscures root visibility.
Aim for soil that holds its shape without dripping water when squeezed gently. This consistency protects your roots throughout the repotting process.
Assessing Root Health
Before starting hands-on repotting work, inspect your root system thoroughly. Tip the pot sideways and slide the plant out carefully. View the entire root ball without breaking it apart.
Look for these signs of healthy roots:
- White or light tan color
- Firm texture when touched gently
- Spread evenly throughout the soil
Unhealthy roots look different and show warning signs. Watch for brown or black discoloration, mushy texture, or bad odors. These symptoms indicate root rot, though some outer browning is normal.
Check whether your plant truly needs more space or just feels slightly crowded. This assessment helps you decide how much root pruning your plant needs.
The Repotting Process, Step-by-Step
Learning the proper technique for repotting houseplants ensures your plants stay healthy. This section walks you through each stage of the transplanting process with clear instructions. Success lies in patience and gentleness throughout every phase.
Step 1: Remove the Plant from Its Current Pot
Start by preparing your plant for removal. Turn the pot on its side and gently tap the bottom and sides. This loosening process makes extraction much easier on your plant’s roots.
Support your plant’s base with one hand while pulling the pot away with the other. Never yank the plant by its stems or leaves, as this causes serious damage. For stubborn plants stuck in their pots, run a knife around the inside edge.
If you have a flexible plastic pot, gently squeeze it to help loosen the soil. Sometimes roots grow through drainage holes. In these cases, you may need to carefully cut protruding roots or break the pot.
Take your time during this step—rushing leads to torn roots that damage your plant’s health.
Step 2: Inspect and Prune the Roots
Once removed, examine your plant’s root system carefully. Gently tease apart the outer roots using your fingers or a root hook. This step is especially important for root-bound plants.
Look for these signs of unhealthy roots:
- Dead or brown roots
- Mushy or soft roots
- Roots circling in tight spirals
Remove unhealthy roots using clean, sharp pruning shears. Make clean cuts rather than tearing or ripping roots apart. You can safely remove up to one-third of the root mass for most houseplants.
For severely root-bound plants, score the root ball with vertical cuts. This encourages new growth outward.
Step 3: Place the Plant in the New Pot
Add a layer of fresh potting soil to the bottom of your new container. This foundation ensures proper drainage and gives roots room to spread. Center your plant so it sits at the same depth as before.
Fill around the root ball with fresh soil while gently pressing to eliminate air pockets. Avoid compacting soil too firmly, which restricts root growth. Leave about one inch of space between the soil surface and the pot rim.
This space allows room for watering without overflow. Make sure your plant stands straight and stable before you finish. Proper positioning sets the foundation for healthy growth in the weeks ahead.
Soil Considerations for Indoor Plants
Getting the best soil for repotting houseplants keeps your indoor plants healthy. The right soil mix determines whether your plant thrives or struggles with root rot. Your soil choice affects drainage, aeration, and nutrient absorption.
Understanding soil composition helps you select the perfect growing medium. Each plant type needs specific soil characteristics to grow strong and healthy.
Types of Soil for Different Plants
Not all potting soils work the same way for every plant. Different houseplants need different soil structures and moisture levels. Learning about soil options helps you choose wisely.
An all-purpose potting mix works well for most common houseplants. Pothos, philodendrons, and spider plants thrive in this type. It contains peat moss or coconut coir, perlite, and vermiculite.
These ingredients create a balanced mix. The soil holds some moisture while allowing water to drain properly.
Specialized soil mixes serve specific plant types with unique needs:
- Cactus and succulent soil contains more sand and perlite for excellent drainage
- Orchid mix is bark-based with large particles that allow air to circulate around roots
- African violet mix is lighter and more acidic than standard potting soil
- Moisture-retentive mixes work best for ferns and tropical plants that prefer consistently damp soil
Using the wrong soil type causes plant health problems after repotting. Read the label carefully to understand the ingredients. The best soil for repotting houseplants matches your specific plant’s needs.
| Plant Type | Soil Mix | Key Features | Drainage Level |
|---|---|---|---|
| Pothos, Philodendrons, Spider Plants | All-Purpose Potting Mix | Peat moss or coir, perlite, vermiculite | Moderate |
| Cacti, Succulents | Cactus and Succulent Soil | Sand, perlite, minimal organic matter | Fast |
| Orchids | Orchid Mix | Bark-based with large particles | Very Fast |
| African Violets | African Violet Mix | Light, acidic blend | Moderate-Slow |
| Ferns, Tropical Plants | Moisture-Retentive Mix | Higher peat moss or coir content | Slow |
Soil Amendments for Healthy Growth
You can improve your potting soil by adding amendments. These additions help customize soil for your plants’ specific needs.
Common soil amendments include:
- Perlite improves drainage and aeration in the soil
- Vermiculite helps retain moisture longer
- Coconut coir offers a sustainable alternative to peat moss
- Compost adds nutrients and organic matter
- Activated charcoal prevents odors and absorbs harmful impurities
You can mix slow-release fertilizers into your soil during repotting. These fertilizers release nutrients gradually over time. Your plant receives steady nutrition throughout the growing season.
Pre-mixed soils are convenient for quick repotting. Understanding amendments lets you create custom soil blends. The best soil for repotting houseplants matches your plant’s exact drainage and nutrient needs.
“Never use regular garden soil from your yard for container plants. Outdoor soil contains pests, diseases, and lacks the proper structure needed for growing plants in pots.”
Garden soil compacts too easily in containers and doesn’t drain well. Always use commercial potting mix or create your own blend. This choice protects your houseplants and gives them the best growing conditions.
After Care Following Repotting
The first few weeks after repotting are critical for your plant’s success. Your newly repotted plant needs special attention during this recovery period. Proper care helps your plant adjust to its new container and build strong roots.
Watering Your Newly Repotted Plant
Right after repotting, water thoroughly until water flows from the drainage holes. This initial watering settles soil around roots and removes air pockets. The water creates good contact between roots and fresh soil.
During the following weeks, be careful not to overwater. Your plant’s root system may be stressed and cannot absorb water efficiently. Check soil moisture by inserting your finger one inch deep into the soil.
Only water when the top layer feels dry to the touch. Different plants need different amounts of water. Adjust your watering based on your specific plant’s needs.
Some wilting right after repotting is normal and doesn’t always mean more water is needed. This is often transplant shock, and your plant will recover without extra watering.
Optimal Light Conditions
Place your newly repotted plants in bright, indirect light for one to two weeks. Direct sunlight can stress your plant while it recovers and establishes roots. Bright light without direct sun gives your plant energy without causing extra stress.
Strong light increases your plant’s water needs and metabolism during root adjustment. After the initial adjustment period, you can move your plant back to its preferred spot. This gradual transition helps prevent shock.
Skip fertilizer for at least four to six weeks after repotting. Fresh potting soil already contains nutrients your plant needs. Keep temperature and humidity levels steady to reduce transplant shock.
Common Mistakes to Avoid When Repotting
Repotting your indoor plants gives them room to grow and access to fresh soil. Many plant owners make errors that can harm their plants. Learning what to avoid helps you repot successfully and keeps your plants healthy.
Overcrowding the Roots
One major mistake happens when you move a plant without loosening its roots first. The root ball is tightly packed and circling inside the old container. If you place this compressed root ball into a larger pot, the roots stay tangled.
The roots won’t spread into the fresh soil around them. They keep growing in circles and never reach the new growing space. Your plant misses out on the nutrients and room available in its new home.
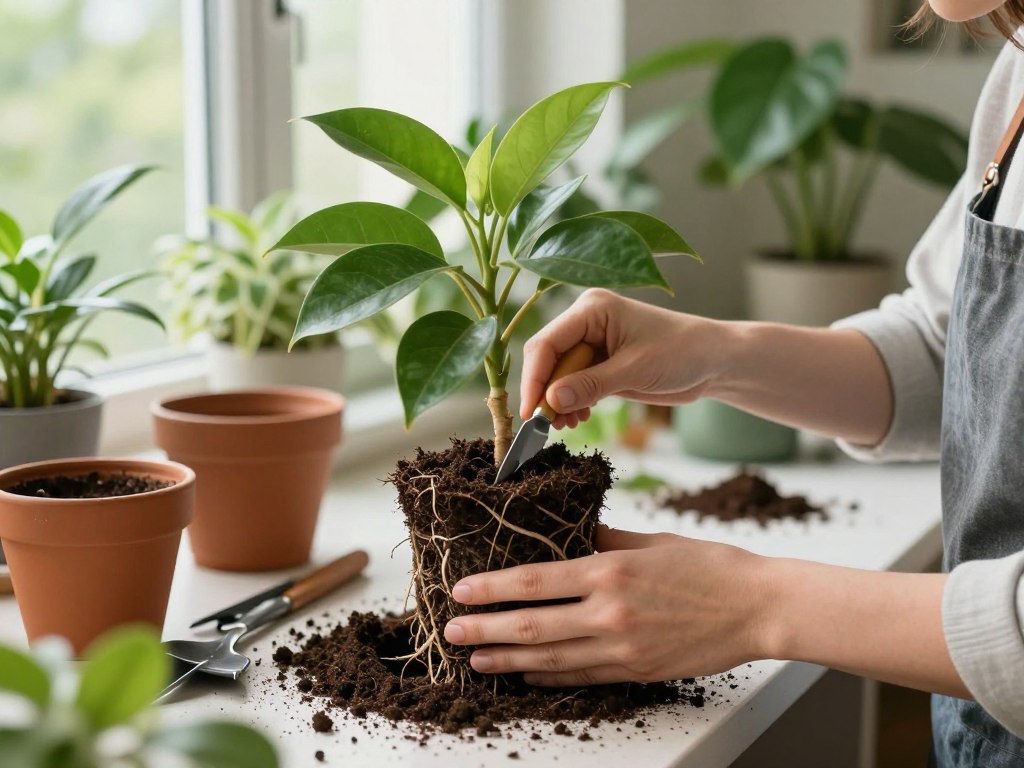
The right approach involves gently teasing apart the outer roots with your fingers. For severely root-bound plants, you can make light vertical cuts along the sides. This encourages roots to grow outward instead of staying tangled.
Be careful not to go too far. Aggressive root pruning shocks your plant and damages delicate root hairs. Find the balance between loosening roots enough and avoiding excessive damage.
Choosing an Improper Pot Size
Bigger doesn’t always mean better for indoor plant pots. Many people pick pots that are too large. They think their plants will have plenty of room to grow.
| Pot Size Mistake | What Happens | Best Practice |
|---|---|---|
| Pot too large (more than 2 inches larger) | Excess wet soil causes root rot and fungal disease | Increase diameter by 1-2 inches only |
| Pot too small | Plant needs repotting again quickly, causing repeated stress | Match pot size to root ball growth |
| No drainage holes | Water pools at the bottom, drowning roots | Always use pots with drainage holes |
| Soil packed too tightly | Restricts root growth and water movement | Gently fill soil around the roots |
A pot that’s too big keeps soil wet far from the roots. This creates conditions where roots rot and diseases spread. Your plant uses energy developing roots to fill the container first.
You might see stunted leaf growth while the plant works underground. Picking a pot that’s too small means you’ll need to repot again very soon.
Other Critical Errors
Avoid these additional mistakes when repotting:
- Repotting during late fall or winter when plants rest and grow slowly
- Using pots without drainage holes, which trap water
- Burying the plant too deep or leaving it too high in the soil
- Pulling on stems or leaves rather than supporting the root ball
- Compacting the soil too firmly around the roots
Proper technique makes repotting successful. Take your time and handle plants gently. Your indoor plants will reward you with healthy growth.
Frequently Asked Questions About Repotting
Ready to start repotting your indoor plants? You probably have questions about timing and frequency. This guide answers the most common concerns plant owners have about this essential care task.
How Often Should You Repot?
The answer depends on several factors. Fast-growing plants like pothos and spider plants need repotting every 12 to 18 months. Slow-growing varieties such as snake plants and ZZ plants only need repotting every 2 to 3 years.
Watch for the signs discussed earlier in this article. Check if roots are growing through drainage holes. Look for water running straight through the pot or slowed plant growth.
Some plants like peace lilies and African violets prefer being slightly root-bound. They bloom better in those conditions. If your plant is healthy and thriving, there’s no need to repot.
Can You Repot During Specific Seasons?
The best time to repot indoor plants is during their active growing season. This is typically spring and early summer. Plants create new growth during this period and recover quickly from repotting stress.
Repotting during dormant periods like late fall and winter is more stressful. Plant growth slows down then. It takes much longer to establish in the new pot.
Certain situations override seasonal timing. If your plant is severely root-bound, dealing with root rot, or in poor health, repot it right away. In emergency situations, you can repot any time of year.
Old potting soil should not be reused since it loses nutrients. It may harbor pests or diseases. Wait 4 to 6 weeks before fertilizing after repotting because fresh soil already contains nutrients.
Some wilting after repotting is normal transplant shock. It usually goes away within a week or two. Wait until after your plant finishes flowering before repotting since it’s using energy for blooms.
Be patient with your newly repotted plants. It typically takes several weeks for them to adjust and show new growth.