Nearly half of indoor plant failures are due to too much water, not too little. This is a surprising fact that shows how common overwatering is in American homes.
This guide will help you fix overwatered plants. You’ll learn to spot soggy soil and root rot. You’ll also know how to stop further damage and save your plants.
Overwatering is common in the U.S. because of low light, poor drainage, and schedules that don’t match plant needs. Winter habits make it worse. The goal is simple: restore oxygen to the roots and stop rot so your plant can grow again.
Follow this guide to watch for signs, take steps for root rot recovery, and prevent future problems. These methods will help you revive overwatered plants with confidence.
Meta title: How to Revive an Overwatered Plant. Meta description: Revive your wilting greens with our expert tips on overwatered plant recovery. Learn the signs, solutions, and preventive measures for healthy growth.
Recognizing the Signs of Overwatering
If your plant looks unwell, start by checking visible cues and the pot. Early recognition helps you act before damage spreads. Below are common indicators to scan for so you can tell if excess water is the problem.
Look for yellow leaves overwatered plants often show first on lower foliage as chlorosis. Leaves may feel limp or appear mushy, with brown tips on some species. Sudden wilting while the soil is wet is a red flag. When roots fail, leaves can drop easily with a light tug.
Soil and root indicators
Feel the top inch of soil and then probe deeper; soggy soil symptoms include a persistently wet surface and saturated lower layers. Check saucers for standing water and sniff for a musty odor, a sign of anaerobic conditions. Visible white mycelium or mold on the soil surface points to fungal growth. When you inspect roots, watch for root rot signs such as soft, brown or black roots that crumble when handled.
How overwatering differs from underwatering
Underwatered pots show dry, brittle soil and crisp, brown leaf edges. Wilting from lack of water usually perks up quickly after you water. Overwatered plants behave differently; they often worsen after more water. Use a moisture meter or a finger test to check deep moisture levels and avoid guessing.
Species variation
Succulents and cacti display translucent, mushy leaves when overwatered. Tropical houseplants like philodendron and pothos show yellowing and soft stems instead. Knowing typical reactions for your plant type helps you read the signs of overwatering faster.
| Indicator | Overwatering | Underwatering |
|---|---|---|
| Soil feel | Cold, wet at depth; soggy soil symptoms often present | Dry, crumbly, pulls away from pot edges |
| Leaf color | Yellow leaves overwatered start lower and spread upward | Browning edges, whole leaf may turn brown |
| Leaf texture | Soft, limp, sometimes translucent in succulents | Brittle, crispy |
| Roots | Root rot signs: brown/black, mushy, break apart | Dry, firm, and sometimes shrunken |
| Response to watering | May worsen after watering; excess moisture persists | Quick recovery after watering |
Immediate First Steps to Save Your Plant
Stop watering right away. The first thing to do is stop adding water to prevent root damage. If you have an automatic timer, turn it off. Also, tell everyone in your household not to water the plant until it starts to get better.
Next, move the plant away from others to stop pests or fungal spores from spreading. Put the pot on a washable tray or an old towel to catch any spills. This helps keep other plants healthy and makes cleaning up easier.
Then, place the plant in a spot with bright, indirect light and good air flow. A north- or east-facing window is best for most houseplants. This helps the soil dry out and prevents fungal growth without harming the plant’s leaves.
Check for any water that might be sitting in the pot and remove it right away. If the pot is inside a decorative outer container, take both out to dry. If the soil stays wet for more than a day, remove the plant from its outer pot to let the roots breathe.
Do quick moisture checks with your finger or a moisture meter. Take a photo and write down the plant’s condition. This helps you keep track of how it’s doing and when to start watering again.
Here’s a quick checklist to help you take immediate action.
| Action | Why it matters | When to do it |
|---|---|---|
| Stop all watering | Prevents further saturation and root suffocation | Immediately upon noticing overwatering signs |
| Isolate soggy plant | Reduces spread of pests and fungal spores | As soon as possible after stopping water |
| Remove saucers/trays | Eliminates standing water that keeps soil wet | Immediately, then check again daily |
| Move to bright, ventilated spot | Speeds drying and lowers disease risk | Within hours; avoid direct harsh sun |
| Do a moisture check and document | Guides further action and tracks recovery | After initial drying period, then regularly |
Assessing the Root System
Before you start, make sure your workspace is clean and your tools are sharp. Carefully remove the plant from its pot to see the roots. This is how you check if the plant has root rot.
How to safely remove the plant from its pot
Water the soil lightly a few hours before you begin. For plastic pots, squeeze the sides to loosen the soil. Hold the stem at the soil line and tilt the pot.
Slide the root ball out gently. For ceramic pots, run warm water on the outside. Use a blunt tool to loosen the edges. Don’t pull the stem hard to protect the roots and crown.
Identifying healthy roots vs. rotten roots
Healthy roots are firm and white, cream, or light tan. They smell fresh. Rotten roots are brown or black, soft, and may smell bad.
Some plants have darker roots naturally. If you’re unsure, compare with a healthy root or a photo.
When to prune roots and how much to remove
Use clean scissors or pruning shears to cut out rotten roots. Cut until you find healthy, white roots. Remove any rotten crown material too.
If the rot is not too bad, cut off 20–50% of the roots. For severe cases, you might need to cut more. If there’s little healthy root left, consider starting over with stem cuttings or division.
Hygiene and disposal
Disinfect your tools with isopropyl alcohol or a 10% bleach solution. Then, rinse them. Throw away any heavily infested soil and contaminated pots. Clean your workspace to protect other plants.
Best Practices for Repotting After Overwatering
Repotting after overwatering needs care and the right tools. Choose a pot with lots of drainage holes. Terra cotta pots are great because they breathe and remove moisture.
Lightweight plastic pots are good if they have big drain holes. But, avoid decorative pots without holes unless you plan to water and drain the plant in its nursery pot.
Instead of using a lot of gravel, focus on the best drainage. A coarse layer under the soil can slow water. Bigger holes and a mix that drains well work better.
For a fast-draining soil mix, use 2 parts potting soil, 1 part perlite, and 1 part orchid bark or coarse sand. For succulents and cacti, use a mix of potting soil, perlite, and coarse sand. If your mix is too wet, add perlite, pine bark, or pumice.
Buy fresh potting mixes from trusted brands like Miracle-Gro or Espoma. This reduces disease risk and gives your plant a clean start.
Repot gently to avoid shocking the plant. Remove dead roots and let the trimmed roots dry for an hour. Then, fill the new pot with mix, place the plant, and backfill gently.
Water only when the roots are dry. If the roots show moisture stress, wait a few days before watering. Don’t fertilize for two to four weeks after repotting.
Keep the plant’s light, humidity, and temperature the same as before. Avoid direct sun for a few days. Watch for stress signs and check moisture to avoid overwatering again.
How to Treat Root Rot and Fungal Infections
If your plant shows soft, dark roots or a sour smell, act quickly. This can limit damage. Start by removing the plant from its pot and rinse the roots. Then, trim away mushy tissue until only firm, pale roots remain.
After pruning, dust the cut areas with cinnamon powder or horticultural sulfur. This reduces infection risk. A one-time drench using a diluted hydrogen peroxide mix can oxygenate the roots. Use this sparingly and only once to avoid stressing the plant further.
For milder cases, try natural approaches first. Cinnamon acts as a mild antiseptic on fresh cuts. Neem oil helps control fungal spores on leaves but offers limited benefit for roots. These options serve as a natural fungicide for plants when you want lower-toxicity choices and when pathogens are not severe.
When you have a confirmed pathogen or the plant keeps declining, consider chemical options. Systemic fungicides can reach root pathogens such as Pythium, Phytophthora, and Fusarium. Look for products containing active ingredients like mefenoxam or thiophanate-methyl and follow label directions closely. Contact your local Cooperative Extension if you need help identifying the pathogen before using treatments.
Several reputable brands are commonly available in U.S. garden centers. Bonide and Bayer Advanced offer products for soil and foliar use. Daconil is useful for surface and foliar fungal control. Southern Ag carries formulations suitable for serious soil pathogens. Availability varies by state and some products require careful handling and protective gear.
Prevent re-infection by using fresh, sterile potting mix and a clean pot. Avoid reusing contaminated soil. Let the repotted root ball dry well before resuming a normal watering schedule. Improve airflow and place the plant in brighter light, then quarantine it for a few weeks while you monitor for recurring symptoms.
If symptoms return or you face persistent decline, send a sample to a plant diagnostic lab. Many land-grant universities provide testing and will identify the organism and offer treatment recommendations tailored to your plant and local rules.
| Step | Action | When to Use | Expected Result |
|---|---|---|---|
| Sanitation | Prune rotten roots, clean pot, use sterile soil | Always before repotting | Limits spread of pathogens |
| Antiseptic Dust | Apply cinnamon or horticultural sulfur to cuts | After trimming damaged roots | Reduces secondary infections |
| H2O2 Drench | One-time dilute hydrogen peroxide rinse | Severely waterlogged soil with anaerobic pockets | Oxygenates soil, can reduce pathogen load |
| Natural Treatment | Use neem oil on foliage; maintain dry conditions | Mild infections, preventive care | Controls spores, low toxicity |
| Commercial Fungicide | Systemic products (mefenoxam, thiophanate-methyl) | Confirmed root pathogens or severe decline | Targeted pathogen control when used correctly |
| Professional Diagnostics | Send tissue or soil samples to a lab | Persistent or unclear cases | Precise ID and treatment plan |
Adjusting Your Watering Routine for Recovery
Fixing a thirsty or overwatered plant needs a careful plan. You’ll move from guessing to a precise method that meets each plant’s needs. Aim for steady progress, not quick fixes. Also, keep track of changes to improve your watering routine over time.
Understanding plant-specific water needs
Houseplants have different watering needs. Succulents and cacti need less water but deeper watering. Tropical plants like philodendron and monstera prefer moist soil but not too wet. African violets do best when the top inch of soil is slightly dry before watering.
Learn about your plant’s natural habitat and growth cycle. This helps you decide if it needs short, frequent rains or long, rare downpours. Adjust your watering plan to match your plant’s natural rhythm.
Techniques for checking soil moisture accurately
Use simple methods to figure out when to water your plants. The finger test is effective: push down 1–2 inches to check moisture. If it’s dry, water. If it’s damp, wait.
Moisture meters like Dr. Meter or XLUX offer more precision. Insert them to the recommended depth and compare readings over time. Remember, meters need calibration and can vary in different soils.
The weight method works for larger pots. Lift the pot after watering and when it’s dry to feel the difference in weight. Use these methods together for better watering decisions.
Creating a seasonal watering schedule
Change your watering schedule with the seasons. In winter, plants grow slower, so water less. In spring and summer, water more as new leaves grow and plants thrive.
Pay attention to environmental cues like temperature, light, and growth. For example, a pothos might need watering every 7–10 days in summer and every 2–3 weeks in winter, depending on the pot size and soil.
Keep a simple watering log or set reminders on your phone. This helps you track your progress and spot trends during the recovery phase.
Improve Drainage and Potting Setup
Good drainage and the right potting setup are key for your plant’s recovery. Check how water flows through the pot and if the soil lets air to the roots. Small changes can greatly reduce the risk of overwatering.
Adding drainage layers and choosing porous pots
Gravel alone is not enough. It can slow drying if the drainage hole is small or blocked. What’s important is that water flows freely through the hole.
Use pots that breathe, like terracotta or unglazed ceramic. They help dry the soil faster. But, terracotta dries quicker, so you might need to water more often. Glazed pots are okay only if you’re sure they drain well.
Using soil amendments to improve aeration
Air is as crucial as water for roots. Add ingredients like perlite, pumice, or coconut coir to improve air pockets. These help water move and keep the mix light.
Try mixes for different plants:
- For tropical houseplants: 50% indoor mix, 20% coconut coir, 20% perlite, 10% orchid bark.
- For succulents and cacti: 40% potting soil, 40% coarse sand, 20% pumice or grit.
- For epiphytes and orchids: 60% orchid bark, 30% charcoal, 10% coarse perlite.
How pot size influences watering frequency
The right pot size is crucial. A pot too large holds too much water, slowing drying and risking root rot. Choose a pot only 1–2 inches wider than the root ball for most plants.
A pot too small dries too fast. This means you’ll need to water more often, stressing the roots. Match the pot size to the plant’s growth and water needs.
Practical fixes today: widen drainage holes, use breathable liners, and avoid compacting soil. Keep the soil loose for better aeration and root breathing.
| Problem | Simple Fix | Why It Works |
|---|---|---|
| Poor outflow through hole | Punch or widen the drainage hole | Allows excess water to escape quickly and prevents waterlogging |
| Heavy, compacted mix | Mix in perlite or pumice (20–30%) | Improves pore space and root oxygenation |
| Using decorative outer pot | Place plant in a breathable nursery pot; lift after watering | Permits proper drainage while keeping décor intact |
| Too-large pot for plant | Repot to a pot 1–2 inches larger than root ball | Reduces excess soil moisture and speeds drying |
| Roots staying too wet | Switch to porous pots terracotta or unglazed ceramic | Wicks moisture away from soil surface and improves drying |
Care Tips to Help Your Plant Recover Faster
When a plant gets too much water, small changes can help it heal. Start with gentle changes in its environment. These changes reduce stress and encourage new growth.
Light, humidity, and temperature adjustments
Move your plant to bright, indirect light. Increase its light exposure slowly over several days. Sudden full sun can burn its weakened leaves.
Keep room temperatures near 65–75°F for many tropical houseplants. This is ideal for their growth.
Improve airflow with a low-speed fan. This helps prevent fungal pockets. If the air is dry, use a humidity tray or a small humidifier. This supports tropical varieties and balances airflow and humidity.
When and how to fertilize recovering plants
Wait 4–6 weeks after repotting before fertilizing. Stressed roots need time to absorb nutrients safely.
When you start fertilizing again, use a balanced, diluted feed. Use 1/4 to 1/2 strength of brands like Peters or Miracle-Gro. Feed lightly and watch for responses to avoid overfeeding damaged roots.
Pruning and removing damaged foliage safely
Trim yellow, mushy, or brown leaves with sterilized shears. This reduces disease pressure and directs energy to healthy tissue. Cut back leggy stems to encourage fuller growth once the plant shows signs of improvement.
For tough cases, prune over multiple sessions. This is less stressful than heavy removal all at once. Proper pruning prevents rot spread and helps monitor recovery progress.
Support weak stems with stakes or soft ties. Check plants often for pests like mealybugs or fungus gnats. These pests can exploit stressed specimens. Keep a simple recovery log with dates and photos to track changes and guide future care.
| Care Area | Action | When to Do It |
|---|---|---|
| Light | Bright, indirect light; increase exposure gradually | Immediately, ramp up over 3–7 days |
| Temperature | Maintain 65–75°F; avoid drafts and cold windows | Continuous during recovery |
| Humidity & Airflow | Use humidity tray or humidifier; add low fan for circulation | Start right away; adjust as new growth appears |
| Fertilizing | Withhold 4–6 weeks; resume at 1/4–1/2 strength | After new growth or 4–6 weeks post-repot |
| Pruning | Sterilize shears; remove mushy or yellow leaves; trim leggy stems | When leaves clearly damaged; light shaping as recovery progresses |
| Support & Monitoring | Stake weak stems; inspect for pests; keep a recovery journal | Continuous; check weekly |
Long-Term Prevention Strategies for Healthy Plants
To keep plants healthy, create simple systems you can follow. Start with a clear plant care routine that fits into your week. This routine helps prevent overwatering and keeps roots healthy.
Setting up routines and reminders for watering
Check your plants at least once a week to spot changes. Use calendar alerts or apps like Planta and PlantSnap to schedule checks. Make sure everyone in your home knows the plan to avoid double watering.
Make a simple chart for each plant. Include name, pot size, soil type, and watering frequency. Post it near your plants or keep a photo on your phone for quick reference.
Monitoring tools: moisture meters and self-watering systems
Choose reliable monitoring tools to remove uncertainty. Models like Dr. Meter and XLUX give fast readings. Hygrometers also help by showing room humidity, which affects watering needs.
Self-watering systems and spikes can prevent underwatering. But, they can cause problems if used with heavy, non-draining soil. Use them only with well-draining mixes and check moisture often to avoid overwatering.
| Tool | Best for | Pros | Cons |
|---|---|---|---|
| Dr. Meter moisture meter | Quick soil checks | Inexpensive, easy to read | Can be less accurate in peaty mixes |
| XLUX moisture meter | General houseplant use | Sturdy, reliable readings | Probe may need cleaning |
| Hygrometer | Monitoring room humidity | Good for tropical plants | Does not measure soil moisture |
| Self-watering pot systems | Consistent moisture needs | Reduces daily watering chores | Self-watering risks if drainage is poor |
| Weight checks | Large pots without probes | No tools needed, simple | Requires memory and practice |
Best practices for seasonal care and pot rotations
Adjust watering with the seasons. Water less in winter and more in spring and summer. Move plants to brighter spots in low-light months to avoid soggy soil.
Rotate pots every few weeks for even light and to check drainage holes. Repot most houseplants every 12 to 24 months. If a plant is rootbound, repot sooner.
Flush containers occasionally if you fertilize regularly. This avoids salt buildup. For local advice, consult your local Cooperative Extension or join U.S.-based houseplant communities for ongoing learning.
overwatered plant recovery
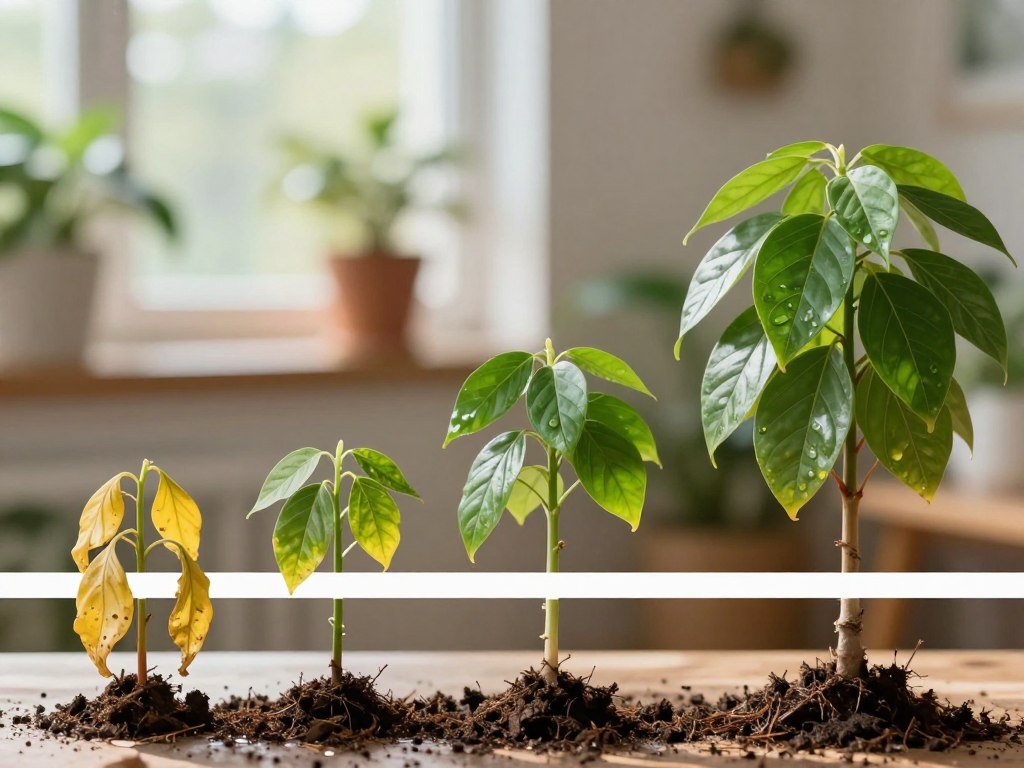
Knowing what to watch for helps you stay calm and act with purpose. Start a simple log with dates, photos, and notes on watering, light, and humidity. This record will help you track plant recovery and spot setbacks early.
Track plant recovery by checking a few clear milestones: no new yellowing or soft stems for 1–2 weeks, firmer roots or soil that dries within expected time, and fresh leaf growth within 4–8 weeks for many houseplants.
Use photos taken from the same angle once a week. Note pot changes, repotting dates, and any treatments such as fungicide or hydrogen peroxide dips. These entries make the overwatered plant recovery timeline easier to interpret.
Below are example recovery timelines for common houseplants. Treat these as guides, not strict rules. Species, pot size, and environment will change the pace.
| Plant | Typical visible improvement | Root recovery or new growth | Notes and propagation tips |
|---|---|---|---|
| Pothos / Philodendron | 2–6 weeks | 4–8 weeks | Responds well to improved drainage. If crown fails, water propagation of cuttings works fast. |
| Spider plant / Peace lily | 3–8 weeks | 6–10 weeks for peace lily | Keep humidity steady. Peace lily roots are sensitive; take divisions rather than heavy trimming when possible. |
| Succulents (Echeveria, Sedum) | 2–12 weeks | New roots from leaf or stem cuttings in 2–8 weeks | Leaf or stem propagation in sterile, fast-draining mix often succeeds when the parent rots. |
| Fiddle-leaf fig / Monstera | 6–12 weeks | 8–12 weeks | Large root systems recover slowly. Consider stem cuttings or air layering if roots are failing. |
When recovery stalls despite correct care, reach out for help. A local nursery like The Sill or a Cooperative Extension office can offer diagnoses. For large indoor trees, a certified arborist gives targeted advice. Lab testing at a land-grant university can find stubborn pathogens.
If a plant has few healthy roots left, you may choose to propagate rather than continue rescue attempts. Learn which method fits each species: water propagation for pothos, soil or soilless media for succulents, and division for clumping plants.
When you decide to propagate overwatered plant material, use sterile tools and fresh media. Label cuttings with dates and care notes. This practice speeds success and creates backups while you monitor the original pot.
Conclusion
Spotting symptoms early is key. Stop watering and move the plant to a well-ventilated area. Isolate affected pots to protect healthy plants.
Boost airflow and provide bright, indirect light. This helps roots dry and recover.
Inspect and prune damaged roots. Then, repot in a fast-draining mix and a well-draining pot. Treat fungal issues with antiseptics or fungicides if needed.
Adjust your watering based on soil moisture, not a fixed schedule. This is crucial for plant care.
Many plants recover well with consistent and calm care. Track progress, take baseline photos, and keep a care log. If unsure, seek advice from a local nursery or horticulturist.
Start by checking your plants, taking photos, and beginning a care log. Small, steady steps prevent overwatering and keep plants healthy for the long term.