Nearly 3 million American households now grow tomatoes in containers. This number shows how popular container tomato gardening has become. You can grow fresh, delicious tomatoes at home with limited space.
Growing tomatoes in pots is easier than you might think. You don’t need a big garden or special experience to succeed. Many home gardeners find container gardening works better than traditional garden beds.
Container tomato gardening opens up a world of possibilities. You gain complete control over your soil, water, and sunlight. Plus, pots are portable, so you can move them easily.
This guide walks you through every step of the process. You’ll learn how to pick the right pots and choose the best varieties. You’ll also discover how to care for your plants from seed to harvest.
Your success depends on understanding a few key basics. These basics are simple to learn and easy to put into action. Get ready to enjoy fresh tomatoes from your own home.
Why Choose Container Gardening for Tomatoes?
Growing tomatoes in containers brings flexibility and control to your gardening experience. You live in an apartment, rent your home, or want to maximize garden space. Potted tomato plants offer a practical solution.
Container gardening removes many obstacles that prevent people from growing fresh vegetables. You decide where your plants live and what soil they grow in. This approach works wonderfully for beginners and experienced gardeners alike.
Benefits of Growing in Pots
Potted tomato plants deliver several real advantages that make container gardening attractive. You can move your containers to follow the sun throughout the day. You can also protect them quickly when storms approach or temperatures drop unexpectedly.
Container gardening gives you complete control over soil quality. This means you avoid problems with poor native soil in your yard.
- Move plants to optimize sunlight exposure
- Reduce pest and disease pressure from ground soil
- Garden in any space—balconies, decks, patios, or driveways
- Use quality potting soil for better nutrition
- Grow tomatoes in rental properties without restrictions
Ideal Planting Locations
Your potted tomato plants need sunshine to thrive. Look for spots that get at least six to eight hours of direct sun daily. Sunny balconies, patios, and south-facing decks work perfectly.
You want locations that are easy to reach for watering and monitoring. Consider places near water sources and away from heavy foot traffic.
| Location Type | Sun Exposure | Best For |
|---|---|---|
| South-Facing Patio | 8+ hours daily | Full-sized varieties |
| East-Facing Balcony | 6-8 hours daily | Most tomato types |
| Sunny Window | 6+ hours daily | Small, compact varieties |
| Driveway | Variable | Mobile containers |
Common Container Gardening Myths
Many people believe that growing tomatoes in containers produces inferior results. This is simply not true. With proper care, your potted tomato plants deliver flavors and yields that rival ground-grown varieties.
Some gardeners think containers need constant attention. Modern techniques make watering and feeding easier than ever.
Myth: Container tomatoes never taste as good. Reality: Homegrown tomatoes from containers often taste better than supermarket varieties. You control the ripening process and soil nutrients.
Myth: You cannot get good yields from containers. Reality: Growing tomatoes in containers lets you produce abundant harvests using less space. Determinate varieties especially work well in pots and produce fruit all at once.
Myth: Pots are too difficult to manage. Reality: Container gardening is actually easier than traditional gardening. You avoid weeding, tilling, and soil preparation challenges.
Selecting the Right Tomato Variety
Picking the perfect tomato variety makes all the difference in your container garden success. Your choice shapes how much work you’ll do and what kind of harvest you’ll get. Understanding the differences between tomato types helps you grow what works best for your space.
Indeterminate vs. Determinate Tomatoes
Tomatoes come in two main growth patterns that affect how you’ll manage them in pots. Determinate varieties grow to a set height, usually between two and four feet. These plants produce most of their fruit at once, making harvest time concentrated and manageable.
They work great for containers because they stay compact. Indeterminate varieties keep growing taller all season long. They produce tomatoes continuously from summer until frost kills the plant.
While you get fruit for months, they need taller support structures and more space. Most patio tomato varieties use the determinate growth style for good reason.
Best Varieties for Pots
Several tomato types shine in container settings. Cherry tomatoes in pots produce small, sweet fruits that grow quickly. Popular choices include ‘Sweet 100,’ known for its productive vines, and ‘Sun Gold,’ beloved for its tangy-sweet flavor.
For patio tomato varieties, consider these proven performers:
- ‘Patio Princess’ grows just two feet tall with full-sized fruit
- ‘Bush Early Girl’ delivers tomatoes in about 52 days
- ‘Tiny Tim’ creates miniature plants perfect for tight spaces
- ‘Tumbling Tom’ produces cascading cherry tomatoes ideal for hanging baskets
Flavor and Size Considerations
Think about what you’ll actually eat. Do you want tiny cherry tomatoes for snacking, or larger slicers for sandwiches? Consider whether you prefer sweet, tangy, or balanced flavors.
| Tomato Type | Size | Flavor Profile | Container Suitability |
|---|---|---|---|
| Cherry Tomatoes | 1-2 inches | Sweet and tangy | Excellent for small pots |
| Patio Varieties | 2-3 inches | Balanced and mild | Perfect for patios and decks |
| Determinate Slicers | 3-4 inches | Meaty and rich | Good with larger containers |
Your selection sets the stage for a rewarding growing season. Match the variety to your available space and cooking style for the best results.
Choosing the Best Pot for Your Tomatoes
Your container choice shapes your entire tomato-growing experience. The right setup gives your plants room to thrive. A poor choice can stunt growth or cause root problems.
Let’s explore how to pick the best pots for tomatoes. Understanding why tomato container size matters is crucial for success.
Recommended Pot Sizes
Container size directly impacts your tomato plant’s health and productivity. For determinate varieties (bush types), a minimum of 5 gallons works well. Use a diameter of 18 to 20 inches.
These compact plants stay smaller and need less space.
Indeterminate varieties (vining types) demand more room to spread their roots. Aim for 10-gallon containers or larger to support continuous growth. Bigger containers offer real advantages: they hold more soil and retain moisture longer.
Going larger than the minimum tomato container size is smart planning. Your plants reward extra space with healthier growth and better fruit production.
Materials: Plastic, Clay, and Fabric
You have three main material choices for growing containers:
- Plastic pots are affordable, lightweight, and hold moisture well. They’re practical for most gardeners and easy to move around your space.
- Clay or terracotta pots look beautiful and allow soil to breathe naturally. The downside? They dry out quickly and can be quite heavy, especially when filled with wet soil.
- Fabric grow bags offer excellent drainage and air pruning of roots, which strengthens root systems. They may need more frequent watering but deliver outstanding results.
Your climate and maintenance style should guide your choice. Hot, dry areas benefit from clay’s moisture retention. Humid regions prefer fabric’s drainage advantages.
Drainage Considerations
Proper drainage prevents root rot and waterlogged soil—two major tomato killers. Every container must have drainage holes in the bottom. Without them, water pools around roots and causes serious problems.
Strategic placement matters too. Use pot feet or small saucers under your containers. This allows water to drain freely and prevents soil from staying wet.
Check that excess water flows out easily after watering. Quality drainage combined with the right tomato container size creates the perfect environment.
Essential Soil and Fertilization Tips
Healthy tomato plants start with what you put in your container. Soil quality and proper nutrition work together for success. Getting these basics right makes a real difference in your harvest.
Types of Soil for Potting
Regular garden soil won’t work well in pots. It compacts too much and doesn’t drain properly. You need high-quality potting soil made specially for containers.
Look for these key features in your potting soil for tomatoes:
- Excellent drainage to prevent waterlogged roots
- Good moisture retention to keep plants hydrated
- Lightweight texture for easy handling
- Built-in nutrients for early growth
Quality mixes include peat moss or coconut coir, perlite or vermiculite, and compost. Boost your potting soil by mixing in worm castings. You can also add slow-release fertilizer pellets before planting.
Organic vs. Synthetic Fertilizers
You have two main paths for feeding your tomatoes. Organic fertilizers like compost, fish emulsion, and seaweed extract release nutrients slowly. They build soil health over time.
Synthetic fertilizers work fast and give you exact nutrient amounts. They’re simple to measure and apply.
| Fertilizer Type | Release Speed | Soil Health | Ease of Use |
|---|---|---|---|
| Organic Options | Slow (weeks to months) | Improves structure and biology | Requires measuring and mixing |
| Synthetic Options | Fast (days to weeks) | Minimal impact | Easy to measure and apply |
Pick the approach that fits your gardening style and goals.
When and How to Fertilize
Timing matters for feeding your tomato plants. Start fertilizing about two weeks after you transplant seedlings into your container. Feed every one to two weeks throughout the growing season.
Focus on balanced nutrients with these ratios:
- Use balanced N-P-K ratios (like 5-10-10) early on
- Switch to higher phosphorus formulas once plants flower
- Phosphorus helps develop fruits instead of leafy growth
- Avoid over-fertilizing, which produces leaves but few tomatoes
Water your plants before fertilizing to protect the roots. Follow package directions carefully. Regular, gentle feeding beats heavy doses spaced far apart.
Planting Your Tomato Seeds or Seedlings
Getting your tomatoes into their pots correctly sets the foundation for healthy growth. Proper planting techniques matter far more in containers than in the ground. Your approach to timing, depth, and spacing determines how well your plants thrive.
Timing Your Planting
Knowing when to plant makes all the difference. Check your local last frost date to plan your planting schedule. Tomatoes need warm soil and air temperatures to thrive in containers.
Consider these timing guidelines:
- Start seeds indoors 6-8 weeks before your last frost date
- Transplant seedlings outdoors when nighttime temperatures stay above 50°F
- Daytime temperatures should reach 60-70°F consistently
- Buy nursery seedlings for quicker results
Starting early gives your plants a head start. Waiting for warm temperatures prevents stress and damage.
How Deep to Plant Tomatoes
One secret to strong tomato growth is planting deeper than the original seedling depth. Burying the stem creates additional root development in your limited container space. This stronger root system supports better nutrient absorption and water uptake.
Follow these planting depth steps:
- Remove lower leaves from your seedling
- Plant the stem up to the first set of true leaves
- The buried stem will develop new roots
- Use quality potting soil to fill around the stem
Proper Spacing Between Plants
Container gardening requires individual pots for each tomato plant. Unlike garden beds, you shouldn’t crowd multiple plants together. Each plant needs its own space to access nutrients, water, and air circulation.
| Plant Type | Pot Size | Plants Per Container | Distance Between Pots |
|---|---|---|---|
| Determinate varieties | 5-gallon minimum | 1 plant | 12-18 inches apart |
| Indeterminate varieties | 10-gallon or larger | 1 plant | 18-24 inches apart |
| Cherry tomatoes | 3-5 gallon | 1 plant | 12 inches apart |
Proper spacing ensures each plant receives adequate airflow. This reduces disease risk in container tomatoes.
Watering Your Potted Tomatoes
Watering is one of the most critical skills in container tomato gardening. Getting this right makes the difference between healthy, productive plants and stressed ones. Your potted tomatoes depend on you to deliver consistent moisture throughout the growing season.
Container-grown tomatoes need attention because pots dry out faster than garden soil. During hot summer months, you may need to water daily or even twice daily. Your watering routine should become part of your daily gardening habits.
Signs Your Tomatoes Need Water
Learning to spot thirsty plants is essential for successful container tomato gardening. Check your soil by sticking your finger one inch below the surface. If it feels dry, water your plants right away.
Wilting leaves indicate your tomatoes are stressed from lack of moisture. You might also notice your pot feels lighter than usual when you pick it up.
Watch for these warning signs:
- Drooping or wilted foliage
- Dry soil at the soil surface
- Noticeably lighter pot weight
- Edges of leaves curling or browning
Best Watering Techniques
The correct watering method protects your container tomato gardening investment. Water slowly and deeply at the base of the plant until water runs through. This ensures moisture reaches the entire root system.
Avoid splashing water on the foliage, as wet leaves promote disease. Early morning watering is ideal before 9 a.m. This allows any moisture on leaves to dry during the day.
Consistency matters greatly in container tomato gardening because irregular watering causes serious problems. Blossom end rot and fruit cracking result from uneven moisture. Your plants need steady, reliable moisture.
Follow these steps for proper watering:
- Water at the soil level, not on the leaves
- Water slowly to allow soil absorption
- Continue until water drains from the bottom
- Water in early morning hours
- Check soil daily during hot weather
Using Self-Watering Pots
Self-watering containers offer a smart solution for container tomato gardening, especially if you travel. These pots feature built-in water reservoirs that maintain consistent soil moisture. A tube draws water from the reservoir up into the soil as needed.
Self-watering pots reduce your daily watering duties significantly. You fill the reservoir every few days rather than watering daily. This consistency helps prevent watering-related problems in container tomato gardening.
Self-watering containers help maintain the steady moisture your tomatoes need to grow strong and produce abundant fruit.
Keep in mind that you still need to monitor these containers regularly. Check the water level in the reservoir weekly and refill as needed. During peak summer heat, even self-watering systems may need attention multiple times per week.
Providing Support for Growing Tomatoes
Your potted tomato plants need help staying upright as they grow taller and produce fruit. Tomato stems are strong, but developing fruit can bend or break them without support. Even smaller varieties benefit from sturdy support systems.
Installing the right support keeps your plants healthy and improves air circulation around leaves. It also makes harvesting easier.
Different Support Options
You have several choices for supporting potted tomato plants. Each method works differently depending on your tomato variety and container size.
- Bamboo stakes – Simple, affordable, and easy to install. Push one stake into the soil next to your plant and tie stems loosely as they grow.
- Tomato cages – Wire cages provide 360-degree support around your plant. They work best for determinate varieties that stay compact.
- Spiral stakes – These twist around growing stems and look attractive. They save space and work well in smaller containers.
- Small trellises – Attach trellises to your pot or position them behind your plants for vining tomato varieties.
| Support Type | Best For | Cost | Ease of Use |
|---|---|---|---|
| Bamboo Stakes | All varieties | Low | Easy |
| Tomato Cages | Determinate varieties | Moderate | Easy |
| Spiral Stakes | Compact varieties | Moderate | Moderate |
| Small Trellises | Vining varieties | Moderate | Moderate |
When to Add Support
Timing matters when adding support to your potted tomato plants. The best time is at planting, right when you place seedlings in their containers. Installing support early prevents root damage from pushing stakes into soil later.
If you forget at planting time, add support when plants are still small and young. Waiting until your plants grow tall makes the job harder. Large stems break easily, and roots get disturbed.
Once plants are established, use soft ties, garden twine, or fabric strips to secure stems. Tie loosely so stems have room to grow thicker.
Managing Weights and Balance
Heavy fruit makes potted tomato plants top-heavy and unstable. Your pot can tip over if weight isn’t balanced properly. Choose containers heavy enough to stay stable, or position pots against walls for extra support.
As fruit develops, check your setup regularly. Move stakes or adjust ties if needed. Consider using wider, shorter containers instead of tall, narrow ones.
They distribute weight better and resist tipping. Your potted tomato plants will produce more fruit when they stay upright and secure.
Managing Sunlight and Temperature
Light and temperature play big roles in keeping your potted tomatoes healthy and productive. Getting these conditions right makes the difference between abundant fruit and struggling plants. Understanding these factors becomes crucial for successful container growing.
Ideal Sunlight Exposure
Tomatoes love sunlight. Your plants need at least 6 to 8 hours of direct sun each day. Even better results come from 8 to 10 hours of bright light.
Without enough light, your tomato plants become tall and skinny with few flowers. Position your pots where they get the most sun during the day. A south-facing window works best for natural light.
You can turn your containers every few days for equal sunshine on all sides. Consider using grow lights if natural light is limited. Full-spectrum LED lights or fluorescent bulbs work great for indoor growing.
Protecting from Extreme Temperatures
Your tomato plants thrive when temperatures stay between 65°F and 85°F. Problems start happening when it gets hotter than 95°F or colder than 50°F.
- Heat stress above 95°F causes poor fruit development and sunscald on tomatoes
- Cold temperatures below 50°F slow growth and can damage your plants
- Move containers to shaded areas during heat waves
- Bring pots to protected spots when unexpected cold arrives
One big advantage of container growing is mobility. You can easily move your pots to different locations as temperatures change.
Using Shade Cloths When Necessary
Shade cloths help protect your tomatoes during extreme heat. Use cloths that block 30 to 50 percent of the sun’s rays. These fabrics reduce heat stress while still letting your plants get enough light.
Shade cloths prevent sunscald on fruit and keep your tomatoes from getting too hot. They work especially well during summer months.
| Temperature Range | Plant Response | Action Needed |
|---|---|---|
| 65°F to 85°F | Optimal growth and fruiting | Maintain current conditions |
| 50°F to 65°F | Slowed growth | Move to warmer location |
| Above 95°F | Poor fruit set and sunscald | Apply shade cloth or move to shade |
| Below 50°F | Growth stops, potential damage | Bring indoors or to protected area |
Managing sunlight and temperature is essential for growing tomatoes on a patio or indoors. Pay attention to these conditions for healthy growth. Your container tomatoes will reward you with plenty of delicious fruit.
Pest Control for Potted Tomatoes
Pests can find your container tomatoes and cause serious damage. Container gardening gives you a key advantage over traditional methods. You can easily move affected plants away from healthy ones.
Different control methods work better with containers than in-ground gardens. Learning to spot pests early stops problems before they spread.
Common Tomato Pests
Several pests target tomato plants regularly. Knowing what to look for helps you act fast.
- Aphids are tiny, soft-bodied insects that cluster on new leaves and stems
- Hornworms are large green caterpillars that eat leaves rapidly
- Whiteflies are small white insects that fly up when you disturb the plant
- Spider mites cause yellow, speckled leaves and fine webbing
You might also see powdery mildew on leaves. Blossom end rot can appear on your fruit. Proper care and spacing prevent these problems.
Natural Pest Control Methods
Start with organic solutions before using strong chemicals. Natural pest control works well for container tomatoes.
- Pick off larger pests like hornworms by hand
- Spray aphids and whiteflies off leaves with a strong stream of water
- Use insecticidal soap or neem oil for soft-bodied insects
- Plant basil or marigolds nearby to repel pests naturally
- Introduce ladybugs and lacewings to eat harmful insects
When to Use Chemical Treatments
Chemical pesticides should be your last choice. Use them only when natural methods fail completely. Apply chemicals only when your entire crop faces serious risk.
Always follow label directions carefully. Check how many days you must wait before harvesting. This keeps your tomatoes safe to eat.
Harvesting Your Tomatoes
The time has come to enjoy the fruits of your labor! Picking your homegrown tomatoes at the right moment makes all the difference. Fresh tomatoes from containers can be just as delicious as garden-grown varieties.
Your patience throughout the growing season now pays off. Vibrant, tasty tomatoes are ready to eat.
Signs of Readiness for Harvest
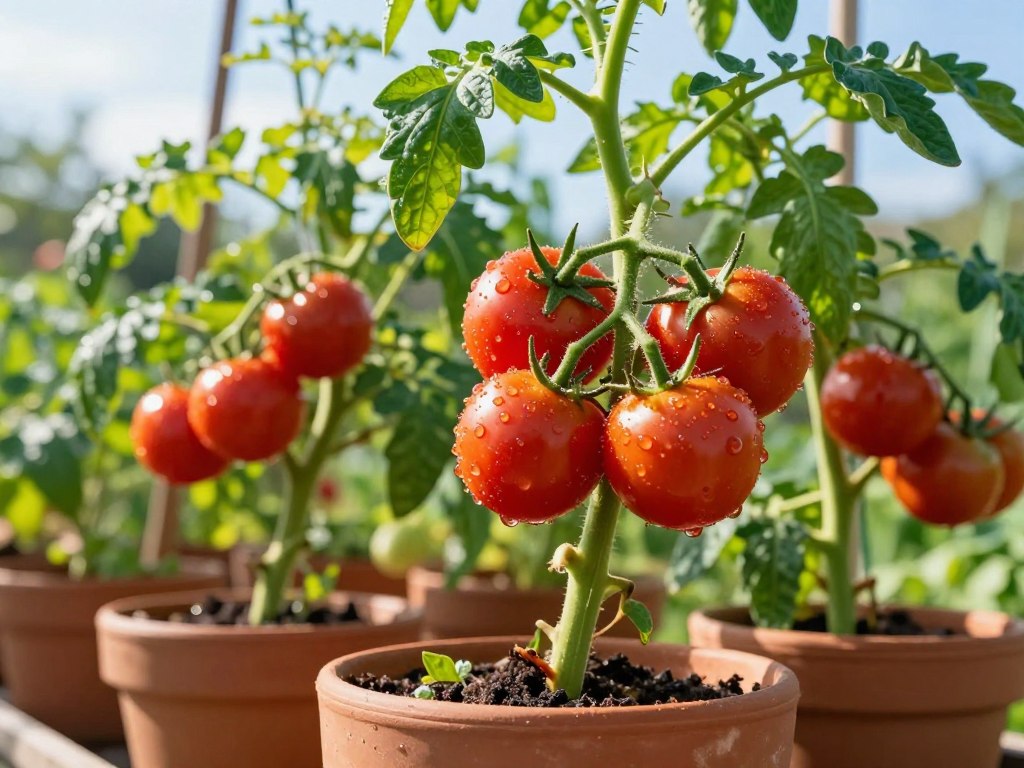
Knowing when to pick your tomatoes is essential. Look for full color development specific to your variety. Most tomatoes turn deep red, but some display golden yellow, orange, purple, or striped patterns.
Your homegrown tomatoes should feel slightly soft when you gently squeeze them. This indicates peak ripeness. The stem end should release a distinctive tomato aroma when you bring the fruit close.
A ripe tomato will twist away from the vine with minimal pressure. You can harvest tomatoes at the “breaker” stage—when they just show color. Let them ripen indoors at room temperature if needed.
Best Practices for Picking
Harvest your fresh tomatoes from containers using a gentle twist-and-pull technique. Hold the fruit in your palm and rotate it slightly until it separates. If tomatoes resist, use clean pruning shears to make a neat cut.
Pick tomatoes in the early morning after dew dries but before intense heat builds. This timing preserves flavor compounds at their peak. Harvest regularly to encourage your plants to keep producing throughout the season.
Storing Your Harvested Tomatoes
Never refrigerate fresh tomatoes from containers. Cold temperatures destroy their flavor and texture. Store ripe homegrown tomatoes at room temperature stem-side down, away from direct sunlight.
Fully ripe tomatoes stay fresh for three to five days. Tomatoes picked at the breaker stage ripen over one to two weeks indoors. For bumper crops, consider freezing, canning, or making sauce to preserve your harvest.
| Ripeness Stage | Storage Method | Storage Duration | Best For |
|---|---|---|---|
| Fully Ripe | Room temperature, stem-side down | 3-5 days | Fresh eating |
| Breaker Stage | Room temperature away from sunlight | 1-2 weeks | Gradual ripening |
| Excess Harvest | Freezing, canning, or sauce making | Several months | Long-term preservation |
Troubleshooting Common Issues in Container Gardening
Even the best gardeners run into problems with their tomato plants. Learning to spot and fix container gardening problems early keeps your plants healthy and productive. Your tomato plant issues may seem confusing at first, but simple fixes can solve most of them.
This guide shows you how to identify what’s wrong and get your plants back on track.
Yellow Leaves and Nutrient Deficiencies
Yellow leaves on your tomato plant can mean a few different things. If older, lower leaves turn yellow first, nitrogen deficiency is likely the cause. Your plant needs more food, so feed it with balanced fertilizer every two weeks.
If your leaves turn yellow but the soil stays wet, you probably have a drainage problem. Check that water drains out of your pot holes easily. You may need to water less often or switch to a pot with better drainage.
Sometimes yellow lower leaves are just the plant aging naturally. As your tomato plant grows, it drops old leaves to focus energy on new growth. Watch the new leaves at the top of the plant.
Blossoms Falling Off
Flower buds dropping off before they become fruit can be frustrating. Temperature swings cause this problem most often. Tomatoes like nights between 55°F and 75°F.
Your plant drops its blossoms as a survival response to extreme temperatures. Move your pot to a spot with more shade if nights are too hot. Bring it inside if frost threatens.
Watering mistakes also make blossoms fall. Water your tomato pot when the top inch of soil feels dry. Dry soil stresses your plant, and so does soggy soil.
Feeding your plant too much nitrogen pushes it to grow lots of leaves instead of flowers. Use a fertilizer with less nitrogen and more phosphorus to boost flowering instead.
Fruit Cracking and Other Problems
Fruit cracking happens when water reaches your tomato’s roots unevenly. Heavy rain after dry weather causes the worst cracking. Keep your watering steady and regular to prevent this.
Water early in the morning so the soil absorbs moisture before the sun heats up. Sunscald shows up as light patches on the fruit. This happens when your tomato gets too much direct sun without afternoon shade.
Blossom end rot creates dark, sunken spots on the bottom of your fruit. This comes from calcium problems, usually caused by watering that jumps between dry and wet. Add crushed eggshells to your potting mix for calcium, and water on a regular schedule.
Catfacing makes fruit look twisted and deformed. Cool nights during flowering cause this issue. Protect your pots with blankets on cold nights when your plant is blooming.