Studies show nearly 80% of houseplant owners lose at least one plant yearly to preventable problems. That staggering number reveals a truth many plant parents discover the hard way. Keeping indoor plants alive requires knowledge and attention to detail.
You bring a plant into your home with hopes of adding life and beauty. Within weeks or months, you watch the leaves turn yellow or brown. You ask yourself, “Why is my plant dying?”
The good news is that most houseplant issues are reversible. You just need to catch them early and take action.
Indoor plants face unique challenges that outdoor plants do not experience. Your home offers limited natural light, controlled temperatures, and restricted root space in small containers. These conditions create an environment where indoor plant problems develop quickly.
Pests find their way inside. Soil becomes waterlogged or too dry. Nutrients get depleted, and diseases take hold in stagnant air.
Understanding why your plant struggles is the first step toward success. Most houseplant issues fall into clear categories: watering problems, pest invasions, and nutrient deficiencies. Environmental stress and fungal or bacterial diseases also cause trouble.
Each problem has its own warning signs. Each one responds to specific treatment strategies.
The sections that follow break down each major category of indoor plant problems. You’ll learn how to spot warning signs before your plant’s condition becomes critical. You’ll discover practical solutions you can implement right now.
You’ll develop the observation skills that separate struggling plant owners from thriving ones.
Successful indoor gardening is not about having a magical green thumb. It’s about patience, observation, and learning what your specific plants need. Understanding these issues will help you create a healthy indoor garden that brings lasting joy.
Overwatering: The Hidden Killer of Indoor Plants
One of the biggest indoor plant care mistakes is overwatering. This problem kills more houseplants than any other issue. Many plant owners think more water means better care.
The truth is different. Overwatering means watering too often without letting soil dry between sessions. Your plants need breathing room in the soil.
Roots require oxygen to survive and thrive. Understanding how overwatering damages your plants helps you become a better plant parent.
Soil that stays wet constantly prevents root systems from getting needed oxygen. This leads to root rot and fungal problems. You can recognize the signs early and save your plants.
Signs of Overwatering
Your plants will show you when overwatering is happening. Watch for these warning signs:
- Yellowing leaves, especially the lower ones on your plant
- Wilting leaves even though the soil is wet
- Soft, brown, mushy roots when you check them
- Mushy or translucent stems near the soil line
- A persistent musty or sour smell coming from the pot
- Fungus gnats flying around your plants
- Small water blisters on the leaf surfaces (edema)
- Pots that feel unusually heavy from excess moisture
These signs mean your plant is suffering from too much water. The root system cannot handle constant moisture, and decay begins. Act quickly to prevent permanent damage.
Preventing Overwatering
The best approach to plant care is prevention. Stop overwatering before it starts by following these practical strategies:
| Prevention Method | How It Works | Best For |
|---|---|---|
| The Finger Test | Push your finger 1-2 inches into the soil before watering. Only water if the soil feels dry at this depth | All plant types |
| Moisture Meter | Insert a digital moisture meter into the soil to get exact moisture readings | Expensive or sensitive plants |
| Drainage Holes | Ensure every pot has adequate drainage holes to let excess water escape | All indoor plants |
| Well-Draining Soil | Use soil mixes with perlite, orchid bark, or sand to improve drainage | Succulents and cacti |
| Seasonal Adjustments | Water less frequently during winter when growth slows | All plants |
Different plants need different amounts of water. A succulent needs far less water than a fern. Consider your specific plant type when creating a watering schedule.
Environmental factors matter greatly. Humidity, temperature, and light levels affect how quickly soil dries. A plant in a bright, warm spot dries faster than one in a cool corner.
Treatment Strategies
If overwatering has already damaged your plant, do not panic. Recovery is possible with the right approach. Start by stopping all watering immediately.
Let the soil dry out significantly before the next watering. Improve drainage in your pot. If the pot lacks drainage holes, move the plant to one that has them.
Remove the plant from its current pot and inspect the roots. Healthy roots appear white or light tan. Rotted roots look dark, soft, and mushy.
Carefully trim away any dead or dying roots using clean scissors. Repot your plant in fresh, well-draining soil. Use a pot only slightly larger than the root ball.
This prevents water from pooling around the roots. Moving forward, adjust your watering schedule based on the finger test method. Check soil moisture before every watering session.
Recovery takes time and patience. Most plants bounce back once you correct this critical mistake. Your houseplants will thank you for giving them proper water and breathing room.
Underwatering: The Quick Decline of Your Greens
Underwatering ranks among the most frustrating problems that plant parents face. Unlike overwatering, which drowns roots in moisture, underwatering slowly starves your plants. Many people make this mistake by following rigid watering schedules instead of checking their plants’ actual needs.
Your green friends depend on consistent moisture levels to transport nutrients and maintain their structure. Scarce water forces plants into survival mode. They begin shutting down non-essential functions to stay alive.
Identifying Underwatered Plants
Recognizing the signs of underwatering helps you catch the problem before serious damage occurs. Your plants will show distinct warning signals when they’re thirsty:
- Dry, crispy leaves with brown tips and edges
- Leaves that curl inward or become brittle
- Drooping or wilting that improves after watering
- Soil pulling away from the pot edges
- Lightweight pots that feel too light for their size
- Stunted growth and slow development
- Leaves dropping easily when you touch them
- Dull appearance lacking their usual vibrancy
The entire plant may look lackluster and stressed. Brown, crispy patches across leaf surfaces indicate prolonged dryness. These visible symptoms mean your plant is already suffering, so quick action becomes essential.
Recovery Techniques
Reviving a severely underwatered plant requires patience and a gradual approach. Flooding a dry plant with water can shock its system and cause additional stress. Instead, follow these recovery steps:
- Use bottom-watering by placing your pot in a basin of water for 10-15 minutes
- Allow the soil to absorb moisture from below, which rehydrates gently
- Water thoroughly but gradually over several days or weeks
- Mist the leaves to increase humidity and reduce transpiration stress
- Trim dead or dying foliage to redirect energy toward healthy growth
- Move the plant to indirect light while it recovers
Severely dehydrated plants often need multiple watering cycles before returning to normal. People expect instant recovery, but that’s unrealistic. Your plant needs time to bounce back, so monitor progress weekly.
Best Practices for Watering
Establishing a sustainable watering routine prevents future underwatering problems. Develop smart habits to keep your plants healthy:
| Watering Practice | How to Apply It |
|---|---|
| Check soil moisture | Insert your finger 1-2 inches into soil before watering |
| Water thoroughly | Pour water until it drains from the bottom hole |
| Group similar plants | Place plants with the same water needs together |
| Adjust seasonally | Water less in winter, more during active growing seasons |
| Use a schedule as a guide | Check plants every few days rather than watering on fixed days |
Different plants have different thirst levels. Succulents need less water than ferns or tropical varieties. Your watering routine should match each plant’s specific requirements.
Seasonal changes affect how quickly soil dries out. Adjust your approach as temperatures shift throughout the year. By understanding your individual plants’ needs, you’ll avoid both underwatering and overwatering pitfalls.
Pests and Insects: Unwelcome Guests
Indoor plant pests are among the most frustrating common houseplant issues you can face. Your home creates a perfect environment for pests to thrive. Unlike outdoor plants, your indoor greens lack natural predators that keep pest populations under control.
Once pests arrive, they spread quickly through your plant collection if you don’t act fast. Understanding what to look for makes all the difference in saving your plants.
Common Indoor Plant Pests
You should know the most common indoor plant pests that invade homes. Spider mites create fine webbing on leaves and stems. Mealybugs appear as white, cottony clusters on plant surfaces.
Aphids are tiny soft-bodied insects that cluster on new growth. Scale insects look like brown or tan bumps attached to stems and leaves. Fungus gnats are small flying insects that breed in wet soil.
Thrips are tiny slender insects that leave silvery streaks and spots on leaves.
| Pest Type | Appearance | Damage Signs | Affected Plants |
|---|---|---|---|
| Spider Mites | Tiny, reddish or yellow dots | Fine webbing, stippled leaves | Roses, ivy, rubber plants |
| Mealybugs | White cottony clusters | Yellowing, sticky residue | Succulents, orchids, ferns |
| Aphids | Small soft-bodied insects | Distorted growth, honeydew | Begonias, coleus, hibiscus |
| Scale Insects | Brown or tan bumps | Yellowing leaves, leaf drop | Palms, ficus, dracaena |
| Fungus Gnats | Small black flying insects | Weak seedlings, root damage | African violets, begonias, moss poles |
| Thrips | Tiny slender insects | Silvery streaks, deformed blooms | Snapdragons, impatiens, gloxinia |
How to Spot an Infestation
Early detection is your best defense against common houseplant issues related to pests. You need to inspect your plants regularly, especially the undersides of leaves. Look for sticky residue on leaves, which indicates honeydew from sap-sucking insects.
Notice any yellowing, stippling, or unusual discoloration on leaf surfaces. Check for distorted or curled new growth that suggests pest damage. Watch for visible insects crawling on stems or leaves.
Pay attention to small flying insects around your plants, particularly near soil level. If you see fine webbing between leaves and stems, spider mites are likely present.
Make inspections part of your routine. Spend two minutes each week examining your plants carefully. Catch problems early, and treatment becomes much easier and more effective.
Effective Treatment Options
You have several approaches for dealing with indoor plant pests. Start immediately by isolating affected plants from your other greenery to prevent spread. Remove the most severe leaves and stems by hand.
Wash remaining foliage with insecticidal soap or neem oil. These work as natural pesticides without harsh chemicals.
- Spray affected plants with insecticidal soap every 7 to 10 days
- Apply neem oil for persistent infestations
- Use rubbing alcohol on cotton swabs for scale insects and mealybugs
- Introduce beneficial insects like ladybugs for biological control
- Try systemic insecticides for severe cases
Persistence matters. Most infestations require multiple treatments over several weeks. Repeat your chosen treatment method until you see no signs of pests.
Wait at least two weeks before returning plants to their original locations.
Nutrient Deficiencies: Signs of Malnutrition
Your indoor plants live in containers with limited soil and nutrients. Over time, the soil gets depleted. Unlike garden plants that search for nutrients in earth, houseplants depend on you.
Nutrient deficiencies look like houseplant disease symptoms but need different treatment. Learning to spot these problems early helps you save your plants.
Container plants exhaust their soil faster than you might expect. After a few months, nutrients wash away during watering. This is why feeding your plants matters just as much as watering them.
Common Deficiencies and Their Symptoms
Different nutrients create different warning signs. Plant leaves turning yellow is one common signal. The pattern tells you which nutrient your plant lacks.
- Nitrogen deficiency causes yellowing on older leaves first, followed by stunted growth and weak stems
- Phosphorus deficiency creates dark green or purplish leaves with poor root systems
- Potassium deficiency shows brown edges on leaves and weak plant structure
- Magnesium deficiency causes yellowing between leaf veins while veins stay green
- Iron deficiency makes new leaves turn yellow while older leaves stay green
- Calcium deficiency distorts new leaves and creates blossom problems on fruit-bearing plants
Multiple deficiencies can happen at the same time. Soil pH affects how well your plant uses available nutrients. Acidic soil locks up some nutrients while alkaline soil blocks others.
Choosing the Right Fertilizer
Every fertilizer package shows three numbers called the N-P-K ratio. These stand for nitrogen, phosphorus, and potassium. A balanced fertilizer like 10-10-10 works well for most houseplants.
| Fertilizer Type | Best For | Application Method |
|---|---|---|
| Synthetic liquid fertilizer | Quick nutrient boost, general houseplants | Mix with water every 2-4 weeks |
| Organic liquid fertilizer | Slow release, sustainable gardening | Mix with water every 2-3 weeks |
| Granular fertilizer | Long-term feeding, low maintenance | Sprinkle on soil surface monthly |
| Succulent formula (low nitrogen) | Cacti and succulents | Every 4-6 weeks during growing season |
| Orchid formula (balanced) | Orchids and epiphytes | Every 1-2 weeks at half strength |
| Flowering plant formula (high phosphorus) | Blooming plants, African violets | Every 2 weeks during bloom |
Read labels carefully before buying. Liquid fertilizers work fast but need frequent application. Granular options release nutrients slowly over weeks.
Organic fertilizers break down gradually while synthetic types work immediately.
Timetable for Fertilization
Your feeding schedule changes with the seasons. Spring and summer bring active growth that demands regular feeding. Fall and winter require less nutrition.
- Spring (March-May) – Start fertilizing every 2 weeks as new growth appears
- Summer (June-August) – Continue regular feeding every 2-3 weeks
- Fall (September-October) – Reduce feeding to every 3-4 weeks as growth slows
- Winter (November-February) – Feed minimally or stop completely while plants rest
Over-fertilizing causes as many problems as under-feeding. Too much fertilizer burns roots and creates houseplant disease symptoms. Watch for white crusty buildup on soil or brown leaf tips.
If this happens, water heavily to flush excess nutrients away. Always follow package directions. Start with half-strength solutions if you are unsure.
Light Issues: Finding the Right Balance
Light is one of the most important factors in keeping your indoor plants healthy. Without the right amount of light, plants develop serious problems that often get confused with other issues. Understanding how light affects your green friends helps you prevent wilting leaves and stunted growth.
Your plants need light for photosynthesis, which powers their entire growth cycle.
Signs Your Plant Needs More Light
Your plant sends clear signals when it’s hungry for light. Look for these warning signs that your indoor plant has inadequate lighting:
- Long spaces between leaves on stems (called etiolation)
- New leaves appearing smaller than older ones
- Stems leaning or reaching toward windows
- Loss of bright colors or patterns in variegated plants
- Plant leaves turning yellow, especially lower leaves
- Leaves dropping from the plant
- Failure to flower or produce new growth
Plant leaves turning yellow in low light means your plant struggles to create energy. The yellowing starts with older leaves because the plant pulls nutrients to focus on newer growth. This survival tactic shows your plant is stressed.
Adjusting for Too Much Light
Excess light creates a different set of indoor plant problems. Your plants may show signs of light burn:
- Brown or crispy patches on leaf surfaces
- Bleached or faded leaf colors
- Leaves curling to reduce exposed surface area
- Wilting during the brightest parts of the day
- Soil drying out very quickly
Use sheer curtains to filter intense sunlight. Move plants away from south or west-facing windows during summer months. Rotating your plants every few days ensures even light exposure on all sides.
Best Lighting Conditions for Common Plants
Different plants evolved in different habitats, so they need different light levels. Here’s what your indoor plants prefer:
| Plant Type | Light Requirement | Popular Examples | Characteristics |
|---|---|---|---|
| Low-Light Tolerant | 2-4 hours indirect light daily | Pothos, Snake Plants, ZZ Plants | Thrive in offices and bathrooms with minimal windows |
| Medium-Light Plants | 4-6 hours bright indirect light | Philodendrons, Prayer Plants, Ferns | Perfect for rooms with filtered window light |
| High-Light Plants | 6+ hours direct or intense indirect light | Succulents, Cacti, Fiddle Leaf Figs | Need sunny windowsills or grow light support |
Grow lights offer a practical solution when natural light falls short. Quality LED grow lights positioned 6-12 inches above plants can successfully replace sunlight. Run them for 12-14 hours daily to match natural daylight cycles.
This approach prevents indoor plant problems caused by insufficient light. Your plants will flourish year-round with proper lighting.
Remember that light intensity changes with seasons. South-facing windows get stronger light in summer but weaker light in winter. Adjust plant positions accordingly to maintain consistent growing conditions throughout the year.
Fungal and Bacterial Diseases: The Silent Threats
Your indoor plants can fall victim to dangerous diseases that spread quickly without proper attention. Fungal and bacterial infections represent serious houseplant disease symptoms that require immediate action. These pathogens thrive in environments with poor air circulation, excessive humidity, and stressed plants.
Understanding how to identify and treat these infections will help you save your plants. You can stop damage before it becomes irreversible.
Identifying Fungal Infections
Fungal diseases create visible houseplant disease symptoms that appear in different forms. Watch for these common signs:
- White powdery coating on leaves (powdery mildew)
- Black sticky coating on foliage (sooty mold)
- Brown spots on plant leaves with yellow halos or distinct borders (leaf spot diseases)
- Black, mushy roots with foul odor (root rot)
- Gray fuzzy mold on leaves and flowers (botrytis blight)
Fungal spores spread easily through water splash and contaminated tools. Quick action prevents spread to your other plants.
Bacterial Problems You Should Know
Bacterial infections create different houseplant disease symptoms than fungi. These infections enter through plant wounds and spread via contaminated water or tools. Common bacterial issues include:
- Water-soaked spots that turn brown or black on leaves
- Mushy, foul-smelling tissue (bacterial soft rot)
- Sudden collapse of the entire plant (bacterial wilt)
Bacterial diseases are harder to treat than fungal problems. Prevention becomes your best defense.
Prevention and Treatment
Protecting your plants starts with proper care practices:
| Prevention Strategy | What It Does |
|---|---|
| Improve air circulation | Reduces humidity around leaves and prevents spore growth |
| Avoid overhead watering | Keeps foliage dry and prevents fungal spread |
| Sterilize pruning tools | Stops disease transmission between plants |
| Remove infected material | Eliminates spores and bacteria immediately |
| Isolate sick plants | Prevents disease spread to healthy specimens |
Remove affected foliage immediately if brown spots on plant leaves appear. For fungal issues, apply copper-based fungicides or sulfur treatments. Isolate infected plants away from your healthy collection.
Some severe infections mean the plant cannot be saved. Understanding this reality protects your entire collection.
“Prevention through proper cultural practices is far more effective than trying to cure established diseases.”
Clean your tools with rubbing alcohol between each use. Water plants at soil level rather than from above. Space plants to allow air movement between them.
These simple steps keep your indoor garden healthy and disease-free.
Leaf Drop: Why Your Plant is Losing Leaves
Watching your plant leaves turn brown and fall off can be stressful. You might wonder why your plant is struggling when you see this happening. Some leaf loss is normal, but excessive dropping signals problems that need attention.
Plants shed leaves as a survival response to stress. They try to conserve energy and resources. Understanding what causes this issue helps you save your plant before it’s too late.
Common Reasons for Leaf Drop
Your plant loses leaves for many reasons. The most common causes include watering problems, pest infestations, and environmental stress. Temperature changes from moving your plant trigger rapid leaf loss.
Low humidity levels in your home also contribute to this problem. Plant leaves turning yellow before they drop often means nutrient deficiencies or pest damage. Insufficient light prevents your plant from supporting all its foliage.
Root problems like rot or being rootbound restrict nutrient flow. Even natural aging of lower leaves is normal. Sudden drops across the whole plant indicate trouble.
Steps to Stop Leaf Drop
Take action quickly to address your plant’s decline by following these steps:
- Check your watering schedule and adjust based on soil moisture levels
- Inspect stems and leaves for spider mites, mealybugs, or scale insects
- Evaluate light conditions and move your plant closer to windows if needed
- Test soil for nutrient deficiencies and apply appropriate fertilizer
- Move your plant away from heating vents, air conditioners, and cold windows
- Examine roots for rot or overcrowding by gently removing your plant from its pot
Consistency matters most. Plants need time to adjust after you make changes to their care routine. Don’t switch conditions too frequently, as rapid shifts stress your plant further.
When to Worry About Leaf Loss
Not all leaf drop means danger. Losing one or two older, lower leaves periodically is completely normal. Many plants naturally drop foliage during winter dormancy without suffering damage.
Watch for these warning signs:
- Rapid loss of multiple leaves within days
- New growth dropping while still green
- Leaves falling combined with soft, mushy stems
- Complete defoliation on plants that should stay green year-round
If your plant loses leaves gradually during seasonal transitions, it’s likely adjusting normally. Severe leaf drop with plant leaves turning yellow or dark spots means serious problems. Act fast to prevent further decline and restore your plant to health.
Root Problems: The Foundation of Plant Health
Roots are the lifeline of your indoor plant. They absorb water and nutrients that keep your plant thriving. When roots suffer damage or disease, your entire plant declines rapidly.
Understanding root problems helps you answer the question, “why is my plant dying?” The answer often lies beneath the soil surface where you cannot see it.
Root issues develop silently until symptoms appear above ground. By that time, damage may be severe. Learning to diagnose and treat root problems early saves your plants from decline.
How to Diagnose Root Issues
You can identify root problems without always unpotting your plant. Watch for these warning signs:
- Persistent wilting despite proper watering
- Yellowing leaves spreading across the entire plant
- Stunted growth that stops improving
- Foul odor coming from the soil
- Water sitting on soil instead of absorbing
Suspect root damage? Carefully remove your plant from its pot. Healthy roots appear white or light tan with small root hairs.
Unhealthy roots look brown or black. They feel mushy, break easily, and smell bad.
Root problems include root rot in houseplants and being rootbound. Poor development in propagated plants also signals trouble.
Solutions for Root Rot
Discovering root rot in houseplants requires immediate action:
- Stop watering immediately
- Remove the plant from its pot completely
- Strip away all old soil gently
- Use sterilized scissors to cut away brown, mushy, or foul-smelling roots
- Treat healthy roots with fungicide or hydrogen peroxide solution
- Repot in fresh, well-draining soil in a clean container
- Reduce watering frequency going forward
Severe root rot may mean your plant cannot recover. In these cases, propagate healthy stem cuttings to grow new plants.
Repotting Techniques and Tips
Proper repotting prevents root problems from developing:
| Repotting Element | Best Practice |
|---|---|
| Pot Size | Choose pots only 1-2 inches larger than the current pot |
| Drainage | Ensure adequate drainage holes in the bottom |
| Soil Mix | Select appropriate soil for your plant type |
| Root Handling | Gently loosen rootbound roots before placing in new pot |
| After Repotting | Water thoroughly to settle soil |
| Timing | Repot in spring for best results |
Repotting too frequently stresses your plant unnecessarily. Waiting too long creates rootbound conditions that limit growth. Strike a balance by repotting only when roots circle the pot.
“Healthy roots mean a healthy plant. Address root issues immediately before they spread to leaves and stems.”
Understanding why is my plant dying often means examining the roots first. Root health determines your plant’s ability to absorb nutrients and water. Invest time in learning these techniques, and your indoor plants will flourish.
Temperature Stress: Seeking Optimal Conditions
Temperature plays a crucial role in your plant’s health. It affects growth rate, metabolism, and flowering ability. Many people overlook temperature as a source of indoor plant problems.
Yet it ranks among the most common houseplant issues in home environments. Your plants experience stress from both extreme temperatures and sudden fluctuations. Understanding proper temperature conditions helps you prevent problems before they start.
Signs of Temperature Stress
Temperature stress shows itself in various ways. These symptoms sometimes resemble other indoor plant problems. Watch for these warning signs in your houseplants:
- Sudden leaf drop of otherwise healthy-looking leaves
- Wilting or drooping despite adequate watering
- Brown or black patches on leaves from cold damage
- Curled or cupped leaf edges
- Slowed growth or complete growth stops
- Failure to bloom at the expected time
- Leaf discoloration or yellowing
Cold stress and heat stress produce different symptoms. Cold temperatures cause dark patches and leaf damage. Excessive heat creates wilting and faded colors.
Drafts from air conditioning units, heating vents, or frequently opened doors create temperature stress. This happens even when your room temperature stays appropriate. Extreme swings between day and night temperatures cause more damage than gradual changes.
Ideal Temperature Ranges
Different plant types thrive at specific temperatures. Use this guide to match your plants with their ideal conditions:
| Plant Category | Daytime Temperature | Nighttime Temperature |
|---|---|---|
| Tropical Plants | 65-80°F | Not below 60°F |
| Succulents and Cacti | 70-90°F | Cooler nights tolerated |
| Temperate Plants | 60-75°F | Cooler winter rest periods |
| Orchids | 65-80°F | 10-15°F drop recommended |
Most common houseplant issues related to temperature occur when conditions differ significantly from human comfort levels. Your plants generally prefer temperatures between 65-75°F. This makes them well-suited to typical home environments.
Adjusting Indoor Climate for Your Plants
Creating the right environment prevents temperature-related indoor plant problems. Implement these practical strategies:
- Move plants away from heating vents and air conditioning units
- Avoid placing plants near drafty windows or exterior doors
- Use a thermometer placed at plant level rather than relying on room thermostats
- Create microclimates by grouping plants together
- Position space heaters or fans to modify temperatures in specific areas
- Understand that window temperatures differ significantly from room temperature
Some plants need specific temperature triggers to initiate flowering or dormancy periods. Understanding these requirements helps you provide optimal care throughout the year. Monitor your plants regularly and adjust their placement based on seasonal temperature changes.
Soil Quality: The Hidden Foundation
Your soil is much more than dirt holding your plant upright. It’s a living ecosystem that supplies nutrients and manages water. It also ensures proper drainage and maintains pH balance.
Many people overlook soil quality as a common houseplant issue. Understanding your soil’s condition helps you avoid indoor plant care mistakes.
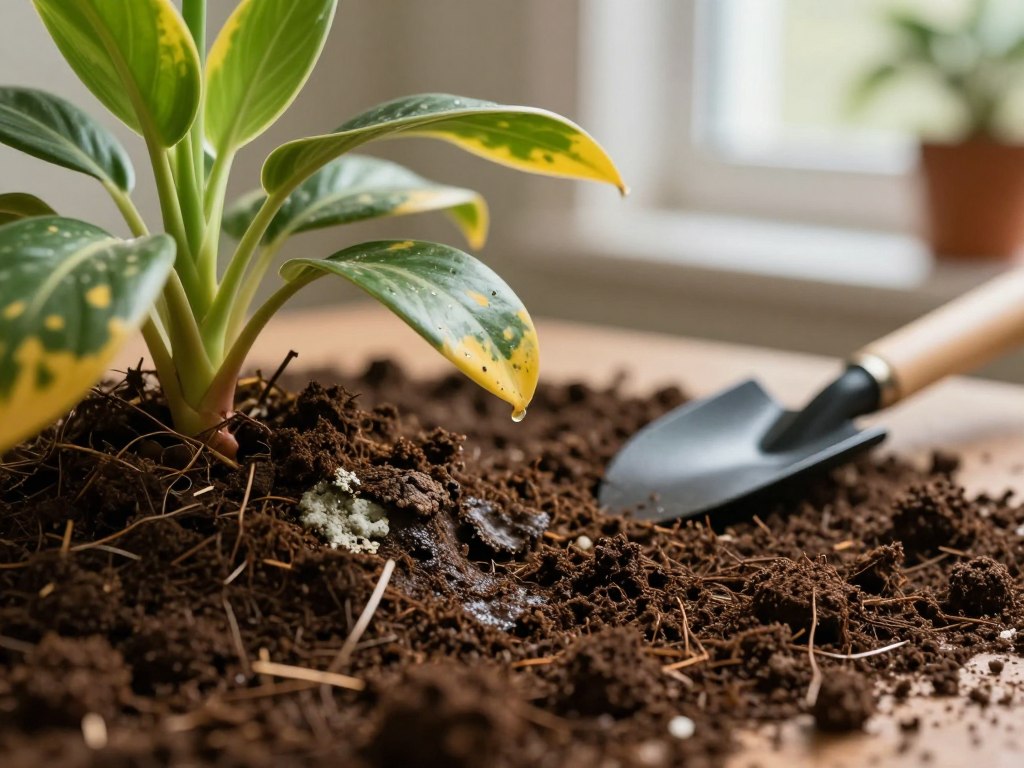
Soil breaks down over time as organic materials decompose. The mix becomes compacted and loses its effectiveness. Most houseplants need fresh soil every 1-2 years, even without repotting.
Identifying Poor Soil Conditions
Watch for these warning signs that your soil needs replacement:
- Water pools on the surface instead of soaking in
- Soil feels hard and compacted
- A foul or sour smell comes from the pot
- White crusty buildup appears on soil surface
- Soil pulls away from pot edges
- Visible mold or fungus grows on top
- Your plant declines despite proper care
These signs indicate common houseplant issues related to soil degradation. Salt buildup comes from fertilizer residue or hard water. Compacted soil blocks drainage and root growth.
Mold suggests overwatering combined with poor air circulation.
Choosing the Right Soil Mix
Different plants thrive in different soil blends. Selecting the correct mix prevents many indoor plant care mistakes.
| Soil Type | Best For | Key Components | Drainage Level |
|---|---|---|---|
| All-Purpose Potting Mix | Most houseplants | Peat moss, perlite, vermiculite | Moderate |
| Cactus & Succulent Mix | Succulents, desert plants | Sand, perlite, minimal peat | Fast |
| Orchid Bark | Orchids, epiphytes | Bark pieces, perlite, charcoal | Very fast |
| African Violet Mix | African violets, episcias | Peat moss, perlite, vermiculite | Slow |
| Seed-Starting Mix | New seedlings, propagation | Peat moss, perlite, vermiculite | Moderate |
Key soil components serve specific purposes. Peat moss or coir retains water and nutrients. Perlite improves drainage and aeration.
Vermiculite holds moisture effectively. Bark pieces provide structure and drainage. Sand helps succulents drain quickly.
Never use garden soil for container plants. It compacts easily and drains poorly. Garden soil also carries pests and diseases.
Create custom mixes by adjusting component ratios based on your plant’s needs. Most houseplants prefer slightly acidic to neutral soil. The ideal pH range is between 6.0 and 7.0.
Replenishing Nutrients
Between complete soil replacements, maintain fertility through smart feeding practices:
- Apply balanced fertilizer during growing seasons
- Top-dress with compost or worm castings every few months
- Flush soil with distilled water to remove salt buildup
- Monitor plant growth and leaf color for nutrient deficiencies
Even with regular fertilization, soil structure eventually degrades. Plan for full soil replacement every 1-2 years. This simple step prevents many common houseplant issues and costly indoor plant care mistakes.
Seasonal Changes: Adapting Your Care Routine
Your indoor plants live inside your home but still follow natural seasonal rhythms. Despite your walls protecting them from outdoor weather, plants respond to light, temperature, and humidity changes. Many people treat their plants the same way all year long, ignoring their natural needs.
This approach leads to problems that could be prevented with simple adjustments.
Winter Care for Indoor Plants
Winter brings shorter days and lower light levels to most of the United States. Your plants slow their growth and need less water during cold months. Check your soil before watering, and water less often than in spring and summer.
Many plants enter a dormancy period in winter, which is healthy and normal.
Heating systems in your home can dry out the air in winter. Tropical plants suffer from this low humidity and may drop leaves or develop brown tips. Set your plants on pebble trays filled with water, or use a small humidifier nearby.
Keep your plants away from cold windows and drafty doors where temperatures drop suddenly.
Winter is the time to reduce or stop fertilizing your plants. Since they are not growing actively, they do not need extra nutrients. If your home lacks natural light, consider using a grow light to supplement sunshine.
Many plants need this winter rest period to flower properly when spring arrives.
Adjusting Care During Summer
Summer brings warmth, longer days, and faster growth for most houseplants. Your plants will need more water because they grow quickly and water evaporates faster. Resume regular fertilizing to support all this active growth.
Summer is the best time to repot your plants or propagate new ones.
Afternoon sun through your windows can become too intense in summer and burn leaves. Move plants a few feet back from south-facing windows, or use a sheer curtain. If you want to move your plants outdoors for summer, do this gradually.
Watch closely for pests during warm months because insects reproduce much faster in heat.
Observing Seasonal Growth Patterns
Each plant has its own natural rhythm. Most houseplants grow actively in spring and summer, so they need more water and fertilizer. Fall is a transition time when growth slows down, and you should gradually reduce care.
Winter is usually a rest period when your plants need very little attention.
Not all plants follow the same pattern. Christmas cacti and amaryllis bloom in winter when most other plants are resting. Some succulents grow more actively in cool months instead of summer.
Keep simple records of how your plants behave each season. This practice helps you learn their specific needs and prevents mistakes from ignoring seasonal changes. Your flexibility in adjusting care throughout the year keeps your plants healthy and strong.